PPT PowerPoint Cheat Sheet

tip 1:  the play button only shows animation for the slide you have selected.  To view the whole slideshow, click the first slide and press the slideshow button).

Tip2:  If you right click on area where there is text, you can select “Action Settings” and hyperlink to other slides/presentations, url, and play sound.

1  SLIDE TRANSITION
a.  Lets you select sound to play when slides transition.
b.  Determines effects for how slides will transition from one to another.

TO USE:
Go to right side of screen and select, “slide transition” from dropdown.  Pick the slides you want to apply the effects to.

FAVORITE EFFECTS:
Fade Smoothly
Random Transition

2  SLIDE DESIGN (Animation Schemes)
a.  For slides you select, lets you set effects for how all the words on the slide will come into the slide.

TO USE:
Go to right side of screen and select “slide design” from drop-down.

FAVORITE EFFECTS:
Wipe
Fade in All
Fade in One by One
Faded Zoom
Zoom
Credits
Float
Faded Wipe
Random Bars
Ascend
Compress
Elegant
Rise Up

3  CUSTOM ANIMATION
a.  Lets you add effects to each word on a slide separately (entrance, emphasis, exit, motion paths).

TO USE:
1.  On task pane, choose “custom animation”, select one of your sentences that you want to animate.
2.  Click the button that says “change” and choose an animation type for your sentence.
3.  Once you choose and animation for it, the green star in the pane will turn red for that sentence.
4.  Click on the drop-down menu next to the red star and select effect options to choose options for sentence animation such as:  horizontal or vertical direction, sound, all at once, by word, by letter, and timing.
Also, you can go to “custom animation”, click on “Master”, click “Slide Mater”, “effect options”.

4  SLIDE SHOW
1.  SLIDE SHOW –  SET UP SHOW lets you set:
a.  lets you set if show presented by a speaker or browsed by a person (allows you to show scrollbar in this case).
b.  lets you set loop continuously, show without narration, show with narration, advance slides manually or using timings.

2. SLIDE SHOW -> rehearse timings -> let’s you see how times go as you are watching the show.

5  OTHER USEFUL TOOLS
1.  INSERT -> date and time
2.  INSERT -> movies and sounds
3.  FORMAT -> replace fonts (lets you replace font types in slides you select)
3.  TOOLS -> customize (to customize tool bars)
4.  TOOLS -> options (lets you select security, etc)
5.  SLIDE SHOW

We hope you find this PPT PowerPoint Cheat Sheet useful for helping to navigate Powerpoint.

Add Social Media Buttons to Website Header in WordPress

Perhaps you want to add social media buttons to your website header in WordPress instead of having them in other places on your site such as your left or right hand navigation, or the top or bottom of your pages or posts.  Adding social media buttons to website headers gives you more room for displaying your website content.  We will show you how to do this including how to create RSS feed in WordPress.

1.  Upload the social media icons you want to use for your blog by going to Media -> Add New in your dashboard.  After uploading each icon, copy and paste the file url for each icon into a text document.  The file url will look something like this:

File URL for Youtube Icon
http://www.abundantideas.com/wp-content/uploads/2012/12/youtube.png

2.  Go to Appearance – > Editor -> Style.css.  Paste the following code into the bottom of your page.

#header_icons img {    

    float:right;

    height:32px;

    width:32px;

    margin:0;

    margin-right:10px;


}


#header_icons {

    float: right;

    padding-top:50px;

    width:250px;

    z-index:-9999;

    padding-bottom:10px;

3.  In the code below, fill in the missing information for each of your social media icons. For example, where it says, “YourTwitterPage”, enter your twitter page.   If there are other Icons you want to add, just use the code structure below for that icon.  Next, go to Appearance – > Editor -> header.php and add the code right after the div id=header tag in the <body> section of the code.


div id=”header_icons”>

<a href=”https://twitter.com/YourTwitterPage” target=”_blank”>
<img src=”Enter Link You Saved For Twitter Icon in Step1
width=”40px”></a>

<a href=”https://www.facebook.com/YourFacebookPage” target=”_blank”>
<img src=”Enter Link You Saved For Facebook Icon in Step1” width=”40px”></a>

<a href=”http://www.linkedin.com/in/YourLinkedInPage” target=”_blank”>
<img src=”Enter Link You Saved For LinKedInPage Icon in Step1” width=”40px”></a>

<a href=”https://YourGooglePlusLink” target=”_blank”>
<img src=”Enter Link You Saved For GooglePlus Icon in Step1” width=”40px”></a>

<a href=”http://YourRSSfeedURL” target=”_blank”>
<img src=”Enter Link You Saved For RSS Icon in Step1” width=”40px”></a>

<a href=”mailto:you@yourdomain.com” target=”_blank”>
<img src=”Enter Link You Saved For Mailto Icon in Step1” width=”40px”></a>

</div>


How To Remove RSS Feed From WordPress Theme

Some WordPress themes might already come with their own RSS image at the top of the page.  You may need to remove this in order to make room for other things you want to put into the header, like your own personalized RSS image.  To remove the default RSS feed image from WordPress, find the code that looks similar to the following and remove it by going to Appearance -> Editor -> header.php

Here is what the code might look like:

<div>

<a href=”http://www.abundantideas.com/feed” title=”RSS”></a>


In my theme, I had to remove the following code:

<div>

 <?php if(get_option(‘Eximius_rssicon’)==’yes’) { ?>


                <a href=”<?php bloginfo(‘rss2_url’); ?>” title=”RSS”></a>

 <?php } ?>

</div>


We hope this has been a useful tutorial for how to add social media buttons to website headers  and to create RSS feed in WordPress.  Feel free to comment and ask any questions.

Online Backup for Sites Manually

Website Backup Using Control Panel

In this article, I go over how to manually back up and restore your website and database.  The steps are actually quite simple and fast.  You can also backup your site using automated backups with free website backup software as your backup assistant, but it is good to know how to backup your site with a manual method, in case you ever need to and it is also a good idea to use this method once in a while to supplement your automated backups.  Losing all the information you worked so hard to gather for your site is not fun, so learning how to protect your information is worth your time.

1.  In Hostgator, go to you Control Panel and under Databases, select “phpMyAdmin”.

2.  On the left hand panel, select the website database you want to back up.  (If you are not sure which one to select, click on a database, and look in some of the files to identify which site the database is for).

3.  Click the “Export” tab and select “Custom”.

4.  Under  “Tables”, click on the “Select All” link to select all the tables.

5.  Under “Output”, make sure “Save Output to File” is selected and “None” for compression is selected, unless your site is very large.

6.  Under “Format”, have “SQL” selected.

7.  Under “Object Creation Options”, select “Add drop table” and select “If not Exists”.

8.  Hit the “Go” button at the bottom of the page and use the “Save As” option to save the file on your computer.

Restore from Backup Your Website Data

Restoring your website manually is just as easy as backing it up manually, you will restore files in no time.  Below are the quick and easy steps.  If you encounter a website restore error, you might want to talk to your hosting provider or web developer to get assistance.

1.  In Hostgator, go to you Control Panel and under Databases, select “phpMyAdmin”.

2.  Click the “databases” tab and pick the website database that you want to restore your website into.  (If you are not sure which one to select, click on a database, and look in some of the files to identify which site the database is for).  You might see a list of tables for your site inside the database.

3.  Next click the “Import” tab.

4.  On the next screen, use the browse button to retrieve the file backup file from your computer to restore data.

5.  Under “Format”, select SQL.  Lastly, click the “Go” button.  This last step may take some time, but eventually you should see a confirmation that the job has been completed successfully.

We hope this has been a useful guide to backup and restore your site data files.  Now you won’t wonder “how do I restore my files”.  You can see that it is actually a lot easier than many people think.  You do not need special technical assistance to do it.

How to Create a Static Front Page in WordPress and Remove Double Home Page Link

static home page wordpressThe default settings in WordPress display the current posts on your home page. You can change this if you want to have a static home page for your site. (Some themes have options for setting up front page features, in which case you can use those features instead of this article.)

1. CREATE A HOME PAGE

In the WordPress panel, go to PAGES and add a new page. Name this page “Home”. Under the “template” option, choose the default option or a custom one. Add any content you would like to add to the page and publish it.

2. CREATE A PAGE FOR YOUR BLOG
(you only need to create this page if you will be using blog features.) You can title the blog page “blog”, “articles”, “news”, or whatever else you want to name it. This page will be the page that shows your blog posts. Do not add content to this page and do not use a custom template. Publish the page.

3. ADJUST SETTINGS FOR YOUR NEW PAGES
Go to SETTINGS -> READING and set the front page displays to “static page”. Set the “front page” option to the home page you created, and if you will be using a blog, set the “posts” page option to the blog page you created. Save.

Enable PERMALINKS to display the page title in the address.

4. REMOVE DOUBLE HOME PAGE IN WORDPRESS NAVIGATION BAR
Some themes already have a “Home” link at the top navigation bar so if you created a “Home” page, you may now have two home links at the top of your navigation bar. To fix this, go to APPEARANCE -> EDITOR -> HEADER. Search for the word “Home” and find and delete the code below, which contains the word “home”. Save.


Click Here To Sign Up For Web Hosting


How to Change the Header in WordPress Using FTP

Change Header In WordPress with FTP1. IDENTIFY THE HEIGHT AND WIDTH OF YOUR HEADER
You can find the size of your header in WordPress by going to APPEARANCE-> EDITOR -> click on Style.css on the list of Template choices. Search for the word “header” in the template. When you look at the codes surrounding the word “header” you will find code like the code listed below which shows the height and width of your header:

/***** PAGE FORMATTING *****/
#header {
width: 1000px;
background: url(images/header.gif) top center no-repeat;
height: 100px;
margin-top: 0;
color: #fff;

2) FIND THE LOCATION OF THE HEADER AND WHERE IT IS STORED
To find the location of your header, you can go to the home page of your site and on the toolbar click VIEW-> source. Search the word “header” and find code that contains the term “header” that looks like the below code:

(“http://www.abundantideas.com/wp-content/themes/eximius/images/header.gif”)

The above code is the path that leads to your image file. You can see that the end of the code says “header.gif”. This is the name of the picture that is your header.

3) CREATE A NEW HEADER
Using the name of the header that you found in step 3 and the size of your header in step 1, create your new header using the same header name and size.  (You can also change the size of your header in Step 1 by changing the height and width in the code shown in step 1.  If you cange the size in this code, create a new header based on this new size.)

4) OPEN AN FTP FILE TRANSFER PROGRAM
For this example, we will be using the client version of FileZilla. You can download this software for free onto your computer.
When using FileZilla, enter your HOST name USERNAME and PASSWORD using the hosting account that hosts your site.  For example, if your host is Hostgator, for the host field, enter the server address for server1.    For USERNAME and PASSWORD, enter your Hostgator username and password for the hosting account that hosts your site.  For the port field, enter 21.

The top left section of FileZilla shows the files on your computer and the bottom left section of FileZilla shows the folder contents after you click on a folder in the top left section. The top right section of FileZilla shows the files on your FTP server. These are the files for your website. The bottom right section of FileZilla shows the folder contents after you click on a folder on your ftp server.

5) TRANSFER YOUR NEW HEADER INTO THE FOLDER THAT CONTAINS THE OLD HEADER
Using the right side of FileZilla, browse for the old header. Find the header using the path you found in step 2.  Using the top right section of FileZilla, follow these steps:   Go to the folder called “public-html”, then the folder with your site’s name, then “wp-content” folder, then the “themes” folder, then go to the theme that is activated on your site and click on it’s folder. Next, click the images folder and browse to find the old image.  You will see the image in the bottom right section of FileZilla

Using the left sections of FileZilla, browse for the new header your created and move  it to the folder that contains the old header. FileZilla will say that a file with the name you want to transfer already exists in the folder. Override that old file to replace it with the new one.

5) MAKE YOUR WORDPRESS HEADER CLICKABLE
If you want to make your WordPress header clickable so that when you click it, your home page shows up, Go to Appearances -> Editor -> click header dot php file, then do the following:

Change from <div id="header">

to: <div id="header" onclick="location.href='http://example.com/';" style="cursor: pointer;">

What is The Difference Between a Post and a Page in WordPress?

Difference Between Post and Page in WordPressWhen you are first starting to use WordPress, it can be a challenge to understand the differences between posts, pages, categories and menus and which of these go in your top navigation and left and right navigation. This article will help you to understand the differences and help you to know when you should use a post versus a page in WordPress.  Knowing this difference is important for setting up your site and getting started with using WordPress.

Features of Posts

1) INCLUDES DATES
Posts are date driven which means that when you use a post, you will see a date at the top of the post showing when the post was written. Posts are most often used for content that is date sensitive such as blog posts, news stories, status updates etc.

2) USES CATEGORIES AND TAGS
You can make different categories for your posts and put your posts into them. For example, you can put a post about business into a business category on your site. Your different categories can be listed on your left or right hand navigation. To create a category, go to CATEGORIES and enter the information for creating a new category. When you write a post, you can easily select which category to put it into from a menu that is provided.

To place your categories into your left or right hand navigation, go to APPEARANCE-> WIDGETS, and drag the categories widget into your left or right hand navigation. If you click the down arrow on the categories widget, you will also see that you have the option to display the categories as a dropdown menu on you site, show the post counts in each category, and show hierarchy.

You can also create subcategories. To create a subcategory, go to POSTS-> CATEGORIES -> fill out the information for adding a new category. To make it a subcategory, under the “Parent” option, choose the category that you want to be above this subcategory.

You can also add tags for your posts when you are writing the post.

3) COLLECTED IN ARCHIVE PAGES
Posts are collected on archive pages (the archive pages include date, category and tag archives.) For example, you might have a dropdown menu on your page that lets a visitor select posts that you have posted for different months. To display archives on your site, go to APPEARANCE-> WIDGETS and drag the archives widget into your left or right navigation.

4) INCLUDED IN RRS FEEDS
Unlike pages, posts are also included in RRS feeds. When a visitor subscribes to a feed, updated information from the feed is downloaded to their computer. This information will include your posts and updates on your posts. To display RSS feeds on your site, go to APPEARANCE-> WIDGETS and drag the RSS widget into your left or right navigation.
Features of Pages

1) DO NOT INCLUDE DATES
Pages do not include dates at the top of the page so pages are better for content that you do not want to date.

2) DO NOT USE CATEGORIES AND TAGS
Pages are not included in categories or tags.

3) HIERARCHICAL
As with posts, pages can have sections and subsections in your navigation (the sections are the parent pages and the subsections are the child pages). Sections and subsections are used more often for regular sites than for blogs. They are good for managing corporate or business sites with broad component but static pages. For example, a corporate site might have a section for a department and subsections under that for sub-departments. If you want to create a subpage, when creating that page, under the “Parent” option, select which page you want the subpage to be under.

You can place your hierarchy of pages in your left or right hand navigation by going to APPEARANCE-> WIDGETS and dragging the Pages Widget into your left or right navigation. If you click the down arrow on the widget, you will also see that you have the option to sort the pages by title, page order, page id, and to exclude page ids. Also, if you go to APPEARANCE-> MENUS, you will see a section called “Pages”. This box shows the pages that are displayed on your top navigation.

4) USED FOR TRADITIONAL WEB CONTENT
Pages are used for traditional web content such as the “about us” page or “contact us” page. They are good for building the navigation for a site. They are often used for the top navigation on sites.


Click Here To Sign Up For Web Hosting


What is the Vlookup Function in Excel? – Your Easy to Understand Guide

HOW TO USE VLOOKUP IN EXCEL-EASY EXAMPLE

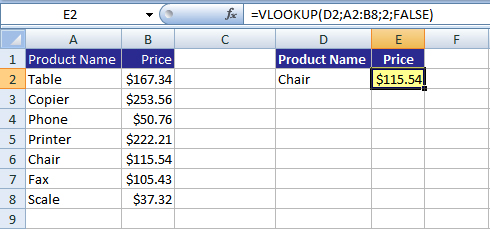
Below is the anatomy of the Vlookup function in Excel. In this article, we clearly explain VLOOKUP with a simple example and the elements of VLOOKUP including LOOKUP_VALUE, TABLE_ARRAY, COL_INDEX_NUM, AND RANGE_LOOKUP.  In this example, we will be using the formula:  =vlookup(D2;A2:B8;2;FALSE).


LOOKUP_VALUE

The lookup_value is the value that you have in one part of your document, whose corresponding value you want to find in another part of your document.
 
EXAMPLE:
You might have a product name in one part of your document, and you want to find its corresponding price in another part of your document.  In the example below, the Lookup_Value is “Chair” in cell D2.  We will want to look up the word “Chair” in the range A2:B8, find the value that is next to Chair, which is $115.54, and place it into cell E2 next to the word “Chair”.  To get $115.54 in cell E2, the formula that we will enter into that cell is =vlookup(D2;A2:B8;2;FALSE). In  this formula, D2 is the Lookup_Value.
 
NOTE:  The lookup_value can be a value (such as number, text, or logical value) or it can be a reference such as A2.


TABLE_ARRAY

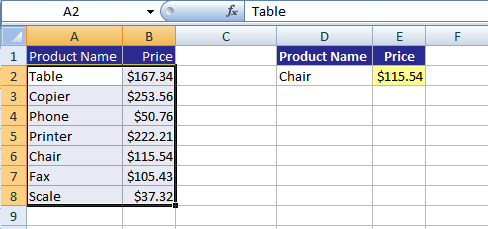
You set the table_array range to specify the range of cells that you want Excel to look thru to find the value you are looking for and then to find it’s corresponding value.  In the example we used above, in the formula =vlookup(D2;A2:B8;2;FALSE), the table_array is A2:B8.  The image below, shows the table_array selected.
 
IMPORTANT NOTE:  The lookup_value you are looking for in the table_array range should be in the first column of the table_array range.  In this example, our lookup_value is “Chair” and it is in the first column (column A) of the table array_range of A2:B8.
 
NOTE: If you use an absolute reference ($A$2:$B$8), instead of a relative reference (A2:B8), it will be easier to copy the formula to other cells. Or else, name the lookup table, and refer to it by name.


COL_INDEX_NUM

Within the table_array range that you specified, which column do you want Excel to look thru to find the corresponding value that you want returned?
 
In the example above, the table_array range is (A2:B8), and you want Excel to return a value from column B of that range (you want Excel to return $115.54 into cell E2), so your col_index_num would be 2 because Column B is the second column in the range A2:B8.
 
1)  If col_index_num is less than 1, VLOOKUP returns the #VALUE error.
(this is because you must specify at least one column)
 
2)  If col_index_num is greater than the no. of columns in table_array, VLOOKUP returns the #REF! error.
(this is because you can’t use a column no. more than the no. of columns you have.)


RANGE_LOOKUP

Range_lookup specifies whether you want an exact or approximate match returned.
In our example, in the formula =vlookup(D2;A2:B8;2;FALSE), we used FALSE to get an exact match.
 
1)  If you use TRUE for Range_lookup:
●  (TRUE is most often used to find numeric data)
●  An exact or approximate match can be returned.
●  Sort the first column of the table_array in ascending order, otherwise you may not get the results you want.
 
2)  If you don’t use Range_lookup:
●  (This is most often used to find numeric data)
●  An exact or approximate match can be returned.
●  Sort the first column of the table_array in ascending order, otherwise you may not get the results you want.
 
3)  If you use FALSE for Range_lookup:
●  (FALSE is most often needed when looking for a text match)
●  Excel will look for an exact match only.
●  The values in the first column of the table_array do not need to be sorted.
●  If there are two or more values in the first column of the table_array that match the lookup_value, the first value found is used.
●  If an exact match is not found, the #N/A error is returned.

What is WordPress?

Introduction to WordPress

This is a basic guide will introduce you to WordPress and it’s features such as what you need to set up a WordPress site. This includes, hosting and a domain name. You will also need to pick a theme or design for your site and install some plugins to enhance the functionality of your site. WordPress is a top choice for creating personal blogs, small business websites, and ecommerce sites. It is very easy to use and offers a lot of flexibility.

Web Hosting

Web hosting is needed for your WordPress site because it provides storage space for your site. Hostgator is one of the most popular web hosting solutions. They have solutions for small sites and business sites and have great prices. Check them out below.

Domain Names

You need to buy a domain name for your WordPress site. The domain name is the URL or address of your site. We recommend Godaddy.com or Namecheap.com. Namecheap.com provides free privacy protection, which is not included with most domain registrars.

WordPress Themes

Themes are designs you can choose for your website once you have WordPress installed. There are thousands to choose from. The designs are easy to change and the content you have written stays in place as you change designs. If you want a custom design, you can hire someone to make one for you.

A theme can be a free theme or a premium theme. Premium themes usually have better designs, more features, and come with support if you have questions.

Below is a list of some of the most popular themes:

Genesis
Genesis is a powerful WordPress theme framework. To see all themes for Genesis, visit StudioPress.com. Genesis Themes have a large selection of designs you can choose from and are search engine optimized. Genesis also provides support through their online community, and has a guide for getting started that you can download.

Thesis
Like Genesis, Thesis is also a very powerful and popular framework.

WooThemes
WooThemes has some very nice-looking themes and some powerful themes if you are looking for specific features such as e-commerce.

Elegant Themes
Elegant themes have beautiful WordPress themes.

WordPress Plugins

Plugins are add on’s you can install on your site which provide enhanced functionality. For example, you can find plugins for creating forms on your site.

There are thousands of plugins for WordPress, both free and premium, and the ones you use will depend on your specific needs.


Click Here To Sign Up For Web Hosting

How to Add Google Adsense to WordPress

add adsense analytics wordpressThis post discusses how you can add Google Adsense to the top or side navigations of your website. Adsense is a very popular way of making money for blogs and for websites. When people click on your ads, Google will pay you some money. The amount of money that you are paid will depend on how much money the advertiser had to pay for the keyword, which is determined by the market. So, if you want to make more money with Adsense, choose keywords that can generate more money.

This article also describes how you can add Google Analytics to your webite, which is another popular tool used by site owners. This tool gives you information about the traffic you get on you site and it can help you to track conversions if you are selling something on your site.

How to Add Google Adsense to the Left or Right Sidebar of WordPress

1. Go to Google and sign up for Adsense. Here is the link to Adsense: https://www.google.com/adsense/

2. Choose the ad format that you want to install. For example, 120 X 240. (Pick an ad type that will fit into your sidebar.)

3. Copy the Adsense code for the ad using the “Copy” link in Adsense.

4. Go to WordPress and find and click on “Widgets” in your left had navigation. Drag a text widget to whichever part of your blog you want your Adsense ad to show up in. For example, if you want the ad to be in the left side bar, then drag a text widget to the left side bar. You can then drag the widget up or down to get it into the order you want it to appear on your page.

5. Click on the text widget and paste your Adsense code into the large text area. Leave the first field blank. Save. It may take a few minutes for the ads to show up (and even longer if you are using Adsense for the first time).


How to Add Google Adsense Ads Above WordPress Posts

If you want to have Adsense ads on your posts but not on the posts as they show up on your homepage:

1. Go to “Editor” in WordPress and find and click on the single.php template. Put your Adsense ad before the following code:

<div class=”entry”>

Or if you can’t find this code, put it before the line that says something like this:

 <?php the_content(‘Continue Reading &raquo;’); ?></div>

(These should put the Adsense code between the post and the title of the post).

2. Hit save and your ad should show.


How to Install Google Analytics Into WordPress

1. Go To Google.Com/Analytics/

2. Sign Up for Google Analytics

3. In WordPress, You Will Not Need A Plugin; You Can Paste The Code Into The Footer.Php File. (Using A Plugin Can Slow Down Your Site).

4. Sign Into Your WordPress Account And Click The “Edit” Button.

5. Click “Check Status”.

6. Copy And Paste The Code Into The WordPress Footer File. This Will Track All Your Pages. To Paste Code Into WordPress, Go To “Editor” => “Footer.Php.” Paste Code Before The End Body Tag which looks like this: </body>

7. After About A Day, You Should Start Receving Statistics.

8. Click “View Report” In Analytics To View The Statistics Reports For Your Site.


Click Here To Sign Up For Web Hosting


How to Create a Facebook Page for Business

1)  Go to Facebook.com.   select:  “create a page” for a celebrity, band or business. 

2)  Select your company classification:

Local business or place

Artist, band, or public figure

Company, organization, or institution

Entertainment

Brand or product

Cause / community

3)  Choose your category and enter your business name.  The business option also asks for further location information. Be aware that your category and name cannot be changed after your page is created.

4)  Set up info for email and passwords.

5)  Enter basic info about your site using “Edit Page”

6)  Set your site address :  Go to MANAGE -> EDIT PAGE -> BASIC INFORMATION -> CHANGE THE USERNAME (you may need to verify your account before doing this)

7)  Facebook offers various features for promoting your pages.  Here are some popular features:

Invite friends.

Tell fans.

Post your status updates.

Promote your page on  your website.

Set up your mobile phone. 

8)  To promote the page on your site find plugins by going to:   MANAGE -> EDIT PAGE -> RESOURCES -> SOCIAL PLUGINS

9)  To see how many people have become fans of your page or “Liked” your page, go to:  MANAGE  -> EDIT PAGE -> INSIGHTS